The Restoration
June-September 2020
Day 1 of Restoration: June 13, 2020
As agreed with the previous owner, we were given permission to work on the bus on their property until we are able to get it running and driven to the storage facility. The first step was to clean the interior of the bus and get most of the previous owners’ junk off the bus. Me, Michael, Andrew and Jordan all pitched in to get this done. By the end of the day, the inside was shiny and fairly clean. However it will need another cleaning when the previous owners remove the rest of their stuff. That will happen in the coming days.

Andrew and Nick removing the junk from inside the bus. Photo by Michael Vass

By 6PM, most of the interior was cleaned with the exception of the area where some of the previous owner's stuff is stored. Photo by Michael Vass
June 16, 2020
While most of the other guys are only available on weekends, I have been making daily trips to the bus. The rest of the previous owner's stuff has been removed and now the interior is empty aside from a few seats. The interior is pretty much cleaned now.

The last of the previous owners' stuff has been removed. It’s now soon ready for seat installation. Photo by Nick Blonski.
June 21, 2020
We found some seats for our bus from another former Calgary Transit unit. (We used several different parts donor buses throughout this project. We chose not to specify what any of them were or their whereabouts). Not wanting to rent a U-Haul, several of us went up in our vehicles to pick up the seats. The seats are going to need a ton of work, as they sat outside to the point where weeds started growing in them. Most of the cushions were unusable. The frames however, are in decent shape and will work for now. We piled as much as we could and drove back to 1130 before dropping the seats, frames and etc. at the bus. The fleet numbers were also made for just under $40 at a local decal shop.
June 22, 2020
I arrived at the bus today to install the batteries and try starting the bus for my first time. I brought my two rebuilt 8D batteries which I had obtained for only about $300 total after exchanging 4 of Darwin’s scrap batteries at a salvage shop. This was a massive saving as brand new 8Ds usually go for between $600-800 a piece. Ken also dropped by to help me out with getting the signs working.
I checked the fluids, wired the batteries with some help from Darwin and turned on the master switch, though despite trying both the button in the operator’s station and the switch inside the engine compartment, the bus would not start. So we spent most of the day diagnosing this problem. Darwin thankfully seemed to be very knowledgeable and was adamant that it was a faulty ground to the starter, so we brought in a massive welding cable from his garage, opened up an engine access panel inside the rear bench seat, and connected the welding cable directly to the starter motor from the battery via an open window. The starter motor spun but the solenoid did not engage in order to crank the engine. This led us to make a conclusion that the solenoid was seized, so we decided to call it a day and go home. But not before Ken removed the memory module for the sign and found some goodies inside the sign panel, including an old maintenance log and a stack of transfers from October 22, 1998! I took these home to iron out and will eventually keep them in the bus for cosmetic purposes.

1130’s new batteries wired up. We used top-post terminals as it was all we had for now. The proper drop-post setup will be done later. Photo by Nick Blonski

Among our finds in the front sign compartment were these transfers from 1998. Despite a few being torn, folded and covered with dust and dirt, they are in amazing condition. Photo by Nick Blonski
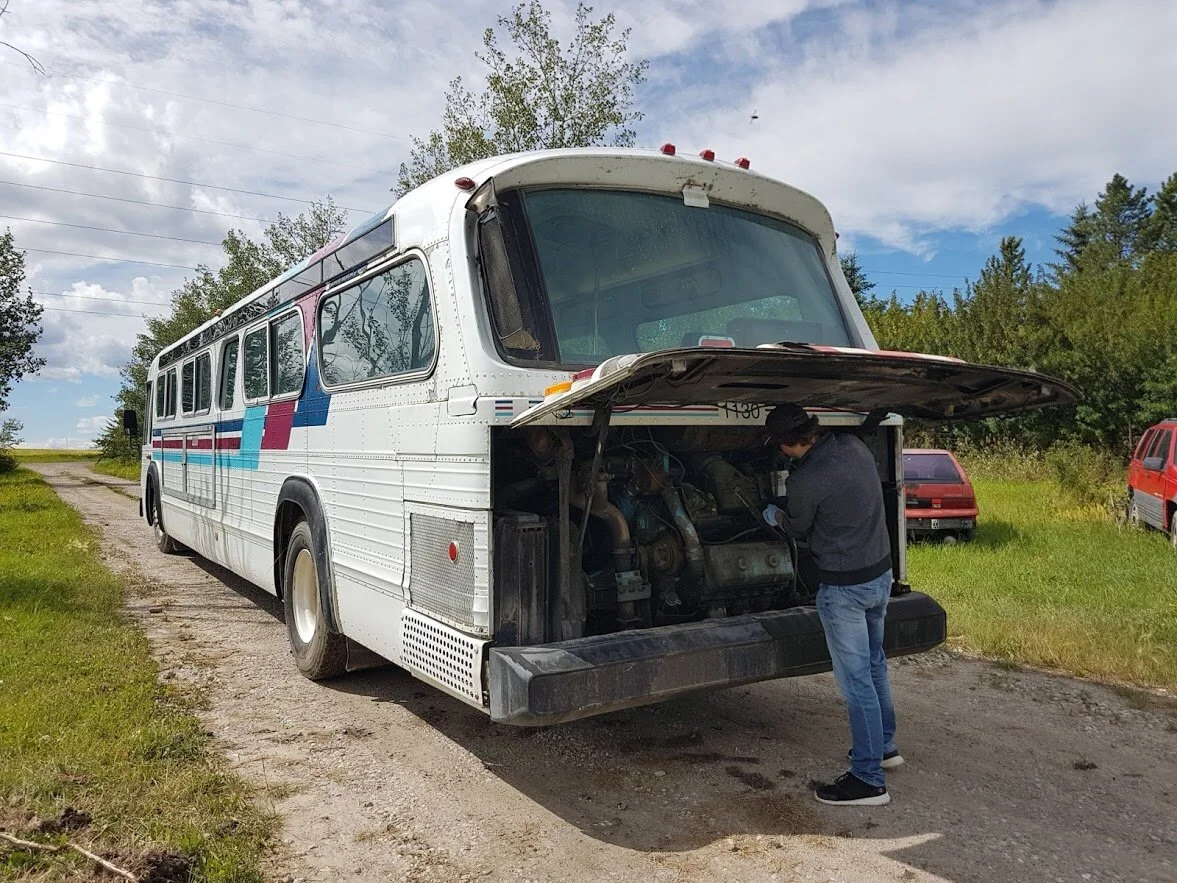
June 26, 2020 - Firing it up!
After getting a text from Darwin saying that he may have incorrectly hooked up the starter last time, I went to 1130 to help Darwin try starting it again. Originally thinking the starter itself was faulty, we had a spare starter on hand which we brought to the bus on a dolly, though as it would turn out later, we wouldn’t need it at all. Darwin had realized that he hadn’t jumped the power to the solenoid itself last time which would explain why the motor ran but the solenoid did not engage. So this time, he made sure to do so using some alligator clips. Sure enough, the motor ran, the solenoid engaged, and the engine began to crank. We were very happy to hear this. We could smell the diesel fuel moving through the system so we knew it was going to start, but it needed a little bit of a kick, so we went around to look for some ether. We got some and tried again. As Darwin ran the starter while I sprayed ether into the air intake, the engine fired up almost right away! We realized that we didn’t even need the welding cable anymore and that the most likely problem is either a bad start wire or bad relay.
As the engine ran and the bus built up air, we discussed a plan for moving it out of its parking spot to harder ground. Though it had been a few days since the last rainfall the ground was still soft and muddy which was a cause for concern. We decided to at least try to move the bus out of the divots and move it further another day. The bus charged up with air, we set the transmission into gear and released the parking brake. Even with the gas pedal all the way to the floor, the bus wouldn’t budge. So Darwin decided to get his neighbour to help out with his bobcat another day. On the bright side, we now know the engine runs beautifully, builds and holds air very nicely, and all systems of the bus work properly including the doors and power steering.

Spare starter for #1130. It eventually turned out we wouldn’t need it. Photo by Nick Blonski
June 28, 2020
Yigal and I visited one of our donor buses. This was a bus that had some parts usable for 1130, mostly from the interior, including the bottom seat cushions which we still needed. The two of us started pulling those along with various other items off of that bus and loading up the car. We then made our way down to 1130 and unloaded our stuff. By this point it was almost 10 PM and getting dark, so we decided to test out the lights on 1130. We fired up the master switch and started playing with all the small switches. We found that all the interior lighting works nicely which was good to see, the headlights work, and all but 3 exterior lights work. Easy fix; all we will need is new bulbs at a cost of about $5 each from Auto Value.

#1130’s interior lighting working beautifully! Photo by Nick Blonski
July 1, 2020
Peter and Ken gave me quite a surprise by heading up to another donor bus and bringing down more stuff for 1130’s interior! This included seat back cushions, the driver’s wall, stanchions, and brackets for the stanchions. They dropped all this stuff off at 1130 as Darwin showed them the bus’s engine running.
As of now I have most of what I need to complete 1130’s interior with the sole exception of seat legs (for side benches) and triangle brackets (for forward facing seats). Unfortunately the guys were not able to scavenge those from the donor as they were all seized, rusted, and impossible to remove. Though what they did manage to retrieve was a massive step forward in this restoration project.

Various interior components stacked inside 1130 from various donor units, ready for assembly. Photo by Nick Blonski
July 9, 2020 - The pullout!
As we were unable to drive the bus out of its spot on its own power, the plan was to bring in Darwin’s neighbour and his bulldozer. After a few days of preparations and buying supplies, as well as a failed attempt where the dozer wouldn’t start, I got a text from Darwin saying his neighbour finally got it started and to come down to 1130 to help pull it out. Darwin wasn’t able to help much today as he had an eye surgery and was in his house resting. He drew a diagram for me to show me how to start the bus’s engine using the alligator clips to jump power to the starter solenoid (as the start button issue was still yet to be fixed).
I opened the engine access panel and started the engine for my first time to build air. Soon after, the neighbour started driving his bulldozer around to the bus and Darwin eventually came out to help hook it up. With his neighbour at the controls of the dozer, Darwin guiding from outside, and me steering the bus, we all began the careful task of dragging the bus out of the muddy pit. It had been a rainy last few days so it was quite muddy and I had almost no control of the steering as the dozer pulled the bus. At one point the side of the bus almost clipped a parked car, though we stopped it just in time, straightened it out, and all was well. Eventually the bus made it out of the tight passageway and out into the large gravel lot at the center of the acreage.
During the pull, Darwin had realized that one of the rear wheels was locked up due to a seized brake. I’ll fix this problem another day with a brake caging tool. After the pullout I had a good look at the bus, now much easier with the bus on hard ground. The tires were caked with mud and the undercarriage was covered in grass and debris. Despite all this, nothing was visibly damaged, the bus was in excellent condition for its age and looked amazing now parked on gravel! Our next steps with the bus parked in this much more pleasant location were to fix the seized brake, top up the engine oil which had gotten low, and scavenge the still-missing seat mounts before we could finally start assembling 1130’s interior.

With help from the previous owner, bus #1130 was pulled by tractor to a concrete parking spot around 30ft from where the bus sat for the last few years. Photo by Nick Blonski

The undercarriage of 1130 after the pullout. Everything is in really good shape for its age. Photo by Nick Blonski
July 11, 2020
A minor problem I’ve been wanting to take care of for a while was the battery tray not sliding in all the way due to two broken bolts sticking out underneath it. One of these being for the missing battery hold down and the other being the rusted T-bolt for fastening the tray in place, both of which will need to be replaced eventually anyway, so I cut these bolts with a hacksaw. Afterwards, the tray could now slide in all the way, but I failed to realize that the wing nuts on the top-post battery terminals stuck up too high. They caught the side of the bus as I tried sliding the tray in and sparked very loudly which startled me quite a bit. I will need to replace the current terminals with the proper drop post battery terminals, which are designed for these kinds of battery trays, in order to close the tray. These unfortunately will have to be ordered online for $50 USD as no local shops seemed to have them. I would eventually get this done in the coming weeks.
Ken met up with me again today and installed the sign back in which he had removed earlier to program and diagnose as it wasn’t working before. We decided to throw in a side sign from an MCI Classic as the front sign for 1130 (the original sign had several stuck flipdots). He also helped me screw in various things inside the bus including the driver’s wall and a few seats and stanchions. Another thing we did was diagnose the turn signals which didn’t work, and discovered that it was a bad turn signal relay. I ordered a new one online.
July 20, 2020
I got most of the missing legs for the side facing bench seats (all but the one slanted leg for the passenger side bench) custom made at a fabrication shop and was pleased to see a job very well done by the fabricators. The cost was a little over $700 total, though it was money well spent with it being virtually impossible to cleanly remove the legs from other buses, as they are fastened to the floor by nuts/bolts underneath the floor that are usually severely seized.

The custom Leg Mounts for the side facing benches. They look fantastic! Photo by Nick Blonski
With all essential bench parts now on hand, it was time to begin the fairly simple yet tedious task of assembling and installing the benches. I attached the legs to the bench frames, assembled the frames and moved them into place, inserted the floor bolts, and went under the bus to secure them with nuts underneath the floor. This was followed by installation of the stanchions that mounted to them as well as the 9-foot long seat back cushions for the benches. The rear section of the interior was now pretty much complete aside from the bottom cushions of the benches which we will still have to scavenge from somewhere. Several of the holes in the floor for mounting of the benches also don’t line up, so new holes will need to be drilled at some point and the existing ones plugged.

The passenger side bench mounted in position. Photo by Nick Blonski
July 21, 2020 - Nick and Yigal’s first time driving a bus!
As per Darwin’s advice, I had put a caging bolt into the brake chamber of the seized right rear brake, caged it about an inch and left it to sit for about a week. Eventually it was time to see if the brakes had loosened. I powered up the bus but it still wouldn’t budge on its own power. So, Darwin hooked up his pickup to the tow hooks of the bus with a plan to “yank” the brakes loose. This was done by me setting the bus’ transmission into reverse and pushing the gas pedal as Darwin tried pulling forward with his pickup. After a few seconds of this, Darwin directed me to set the bus’ transmission into drive and press the gas pedal again as he continued to pull forward. Much to our satisfaction, the bus began to move, and all wheels were turning!
Darwin disconnected the chains and moved his pickup out of the way. I removed the caging bolt from the brake chamber, and then got back in the driver’s seat to get my first few minutes of driving a bus. A lot of power was needed to move the bus at first as the brakes were still dragging slightly. I drove the bus through the tight acreage driveway, out onto the gravel road for about 50 metres, and back into the acreage via the other driveway. The bus handled very nicely.
Later that evening, Yigal said he was available, so him and I went back to 1130 so that Yigal could get a taste of driving 1130 himself. The bus was powered up again and I drove first to demonstrate. Then it was Yigal’s turn to jump in the driver’s seat. This began with a brief startle for both of us as Yigal took the first left turn out of the acreage driveway too tight, causing the left rear wheel to dip into the ditch, and part of the underframe to scrape against the ground. A quick inspection revealed no damage at all. The two of us then took turns doing about 2-3 more laps with the bus into and out of the acreage before calling it a night.
July 25, 2020 - Andrew and Jordan’s first time driving a bus!
Andrew, who lives in Edmonton, was in town this weekend and said he was available on Saturday, so I took him to 1130 and invited Jordan to come later in the day. Andrew and I fastened the forward facing seat backs to the frames and then began trying to find ways to measure the amount of fuel in the tank. Concerned that it was empty, I decided to go to Canadian Tire to buy a 20L jerry can and fill it with diesel to pour in. Andrew tagged along and went to grab lunch as I got the fuel.
When Andrew and I returned to the bus, Jordan was there waiting. The focus now became primarily on figuring out how to fill the fuel tank with diesel and measure the fuel level. The design of the filler made this nearly impossible due to a special spring loaded valve that Calgary Transit had installed which must be pushed in to fill the tank. This valve would also make the bus impossible to fuel at a normal public gas station. Thus the filler assembly was removed from the bus and Darwin helped Jordan and Andrew remove the valve as I began the annoying task of pouring diesel from the jerry can into the tank. Once this was all complete and the filler was reinstalled, the three of us used a long blade of grass to dip the tank, and discovered that there was plenty of fuel in it after all. Now it was time for Jordan and Andrew to get a taste of driving 1130.
I started the bus and showed the guys all the functions and features of it as it built up air. Then I had a brief struggle to get the bus moving as the ground was still very muddy from a recent rainfall. With a few cycles between reverse and forward, I freed the bus and drove the usual lap around the acreage to demonstrate to the two guys.
Afterwards, Jordan and Andrew, both nervous and hesitant, decided Jordan would go first. Jordan jumped in the driver’s seat. Despite struggling with the second left turn back into the acreage during which I had to briefly take over, Jordan did great and Andrew was next. With Andrew being an OMSI player too, driving the bus came quite natural for him. Though we ran against some hidden rocks in the grass on the return driveway into the acreage which made a loud banging noise inside the bus. A quick inspection revealed no damage. Andrew then chose to do one more lap before the three of us called it a day.
July 29, 2020
Armed with power tools and a ton of extension cord, I came to 1130 to begin what was probably the most grueling task of this restoration project: Installing my aftermarket fender flares onto the bus as a replacement for the missing originals. To do this, I had to drill new holes (about 15 per flare) for each fastener through multiple layers of aluminum as well as the slashed remnants of the old flares. Figuring out where to drill these holes was a challenge as it was difficult to know where there was nothing obstructing a clean drilling of a hole straight through. Trial and error was used a lot for this and some holes could not be drilled due to a crossmember in the way or one of the bolts for the old flares. A few new holes for screws had to be drilled in the fender flares themselves when the existing holes proved impossible to drill all the way through. About three drill bits were broken throughout this project as well!
Eventually all 4 fender flares were firmly secured onto the bus, and all the hard work proved worth it, as the bus looked much better now! It really is surprising how much of a difference something as small and simple as fender flares makes on a bus’s overall appearance. The flares will also make the bus easier to drive as it will now be much easier to see the pivot point (rear wheel) in the mirrors.


#1130 with its new fender flares installed. Photos by Nick Blonski
August 3, 2020
Ken said he was available to meet in the early morning to offer his long-awaited diagnosis and repair of the destination sign system which hadn’t been working whenever the bus was powered on. Firstly, some 3 inch long bolts were used to fasten the front sign to the bracket, as it was an MCI Classic side sign which was slightly shorter than the original GM front sign. Now the sign looked much better from outside as it was no longer resting on the exterior glass panel.
Then came the task of diagnosing the electrical issue preventing the sign from operating. Ken worked on this as I fastened various loose parts still remaining including the driver’s running board and transfer pad (which proved to be more of a challenge than expected as new holes had to be drilled, and much like for the fender flares, figuring out the best place to drill without anything getting in the way, was difficult). I also organized all the necessary supplies that would have to stay with the bus and placed everything in a large cardboard box I had brought. This box would now serve as the permanent onboard maintenance kit for 1130.
Eventually Ken discovered that an electrical ballast for one of the fluorescent sign lights was overheating and tripping the system out, which explained the signs not working. He disconnected this ballast and the system now worked. The front sign and memory module (we had decided to use the larger Vultron III module found on the MCI/New Flyer buses as 1130’s original Vultron II module wasn’t working well) worked perfectly and was already loaded with all the Calgary Transit codes. Just two small problems now remained with the signs. The side sign was all jumbled up, and the rear sign was frozen. Ken decided to leave this diagnosis for another day.
We then installed two hooks on the front doors to use to lock the bus when parked. All that was left now was for me to find some long enough padlocks to be able to lock the doors. Then we discovered that there was still lots of time before we both had to leave, so we powered up the bus and decided to take it for a spin!
This would be the longest drive so far that 1130 would be taken on under its new ownership. Ken wanted to take it for a spin all the way around the block, so that’s what we did. This long drive highlighted my need to fix the starter’s electrical fault and seal up that engine access panel as thick smoke filled the interior through the loose panel. Despite that, the V730 transmission shifted nicely and the bus was found to run like a typical Fishbowl… very slow going up hills!
When we returned, Darwin was there. I decided to ask him about the forward facing seat triangle brackets which were still annoyingly missing. Darwin revealed that he had a 3D printer that could manufacture the brackets out of carbon fibre/epoxy as long as I remove the one bracket we did have to give to Darwin as a reference, and cover the cost of supplies. As I had still been unable to successfully scavenge the original triangle brackets from any other bus, I decided to take him up on that offer for the sake of bringing 1130’s interior to cosmetic completion.

The Interior is now mostly complete aside for seat brackets. Smoke can be seen filling the interior from the open engine access panel as Ken drives. Screenshot taken from a video recorded by Nick Blonski

Thanks to Ken, using a replacement Vultron III module which is still programmed with Calgary Transit codes, the front destination sign is now fully operational! Posed as current Route 12 - Southwest Loop. Photo by Nick Blonski
August 8, 2020 - Michael’s first time driving a bus!
It’s been quite awhile since Michael has last worked on the bus due to work but was back at it, hoping to take 1130 for a spin. Michael and I started off by installing our new turn signal relay and testing my two locks on the newly installed hooks.
With all that sorted out, it was time to get the bus started. The bus started up but to our surprise, it did not air up. We heard a pulsating hiss of leaking air coming from underneath the bus. I moved the master switch to “engine off”, though with zero air in the system, the normal engine shutoff valve wouldn’t work, so we had to go to the back to use the emergency shutoff switch. I called Darwin to come out and help us.
After shutting off the engine, we then started it again to diagnose where the leaking air was coming from, and eventually discovered that it was coming from the purge exhaust port, at the bottom of the air dryer. It would eventually turn out that the purge valve on this bus is prone to sticking open. I tapped on it with a mallet and the valve snapped shut, causing the air to stop leaking. Finally, the bus started to air up, and we were able to get it rolling.
We drove for a short 30ft, until the emergency engine shutoff switch vibrated out which stalled the engine in the middle of Darwin’s driveway. After about 30 minutes of trying to get the switch back in with no luck, Darwin’s son showed up and got Darwin back out to help us out again. Using a mallet, he properly showed us to get the switch in and we were back to taking the bus for a spin. I drove a lap and it was then Michael’s turn. With his previous experience from driving airport vehicles, he drove it with ease. After taking it for a few laps, we parked the bus, shut the engine off with the master (the engine’s normal shutoff valve gave us no further issues) and locked the doors for the first time.

Some fun with the destination sign while dealing with engine trouble. Posed as now discontinued Route 445 - Skyview. It was very unlikely that this bus ever served that route as it was a community shuttle route introduced in 2011. Photo by Michael Vass

Posed as former Route 71 - Martindale which ran from Martindale to Whitehorn Station until late 2007 when McKnight-Westwinds Station opened. Photo by Michael Vass

1130 stalled in the middle of Darwin’s driveway. Photo by Michael Vass
Stalled! Nick attempts to reset the emergency shutoff switch. Photo by Michael Vass
August 30, 2020
With not much else to do as we were still waiting for the carbon fibre seat brackets to 3D print, me, Michael, Yigal, and his friend Claudio decided to take 1130 out for a spin for fun. Darwin suggested that we take it on a longer drive this time than usual to warm up the engine more than we had been before. We found an easy way to fix the issue of smoke filling the interior by placing a heavy object down on the engine access panel to prevent it from sliding open.
The bus still wasn’t registered or insured, so we decided to head east, away from Calgary, for about 10 km down a deserted gravel road, loop around the hamlet of Indus and return. We stopped for a quick photo stop at a railway crossing each way and had a great time on our little road trip with a GM Fishbowl!
About three or four times during this trip however, the purge valve, which had already given Michael and I issues previously, continued to be a nuisance by sticking open and preventing the bus’ air supply from recharging. I had to pull over and tap on the air dryer with the mallet each time to fix this issue. Despite being an easy on-the-road fix, I can’t be taking the bus everywhere with this happening all the time, so I added fixing the purge valve to my to-do list for the bus.

From the inside of 1130 on Township Road 230 on our way to Indus. Photo by Michael Vass

Photo stop just past the railroad crossing. Photo by Michael Vass

Another photo stop before returning back to Darwin’s to park the bus. Note the Calgary Skyline just noticeable in the background. Photo by Michael Vass
September 5, 2020
Andrew was once again in town and offered his help with 1130’s restoration work. After a very long wait for the 3D printed makeshift triangle brackets, they were finally ready, and I had them painted silver grey in my dad’s shop. So with all our supplies finally on hand for completing the forward section of the bus’ interior, Andrew and I got right down to work.
We first attached all the triangle brackets to the seats using a 3 inch long bolt for each seat. The original design with the steel brackets called for a 2.5 inch long bolt that screwed into threading inside the bracket itself, but the threading inside the center hole of the carbon fibre brackets wasn’t strong enough to tighten a bolt into, so we decided to force a slightly longer bolt all the way through the bracket so that we could fasten it with a nut on the bottom for extra support.
Then, we arranged the seats into position, first fastening the floor mounts to T-bolts in the floor track using fine-threaded acorn nuts as per original design (which I had to order online as no local shops had them!). At the same time, we made sure to align the wall mounts with the T-bolts in the wall track, and then fastened those as well. Unfortunately one of our carbon fibre triangle brackets got broken during this process, though thankfully Darwin had printed some spares.
A few days later, after I had painted the spare seat brackets, I went back to install the final forward facing seat into 1130, leaving just the bottom cushions for the side facing bench seats in the rear section as the only thing still missing in terms of seats. I am not sure where we will get those from yet.

The forward section of 1130’s interior is now complete. Photo by Nick Blonski
September 10, 2020
With the interior now complete to the greatest of our abilities with the parts available to us for now, and Darwin soon getting a container delivered to his acreage which will need the space where 1130 sits, 1130’s ~8 years of living on this acreage will soon be coming to a close. I found a brand new RV lot under construction a few blocks away, and after calling the owner and getting a great deal at $25 a month due to the construction, I decided that this lot would become 1130’s new home.
Before moving the bus out, I wanted to try and fix the lingering issue with the purge valve sticking open. Using a large pair of groove-joint pliers which opened up to 2 inches, I removed the screw-on assembly of the purge valve from the air dryer and showed it to Darwin, who soaked it in a cold parts cleaner and left it to sit overnight.
There were also 4 extra bus wheels on Darwin’s property which I was originally planning to load onto the bus and take away. After looking at them up close though, I realized the tires were in very poor condition, but the rims were decent, so I posted a Kijiji ad for the rims as they would be useless for 1130.

The bottom of 1130’s Bendix AD-2 air dryer showing the screw-on purge valve. It was seizing up and sticking open, preventing air from recharging. It will need to be removed and repaired. Photo by Nick Blonski
September 12, 2020 - 1130 Moves to Her New Home!
The time has come for bus #1130 to be moved to her new home a few kilometers from Darwin’s. Preparation started by getting some work done with Andrew and Michael removing some of the grime caused by rust and me getting underneath the bus to reinstall the freshly rebuilt purge valve. Despite soaking it in cold parts cleaner a few days earlier, it was still badly corroded, so I had taken it home to my dad’s shop the night before to completely take it apart and thoroughly clean, grind, and lubricate all the inner workings. Hopefully the valve will no longer stick open and give us any more issues now.
I am quite amazed at how far this project has come in the last three months since I purchased the bus, even though the adventure has only just begun. Peter and his friend stopped by and Peter will be driving 1130 to her new home with his friend driving behind us to take us back to Darwin’s to retrieve our vehicles. I called the owner of the RV lot that we would be there in 20 minutes. With that all taken care of, and a few final photos of 1130 at her old home, 1130 departed Darwin’s acreage for the final time.

1130 just before departing for its new home. Appropriately signed up as Route 66 - SE Industrial. Photo by Michael Vass

1130 arriving at its new home at the RV lot which is still under construction. Note all the haze from all the forest fires. Photo by Michael Vass

Parked at her new home. Photo by Michael Vass

Peter, Andrew, Michael and Nick stand in front of 1130 for a photo after completing its run to its new home. A big thanks to Peter’s friend for the photo and him driving Peter’s car behind us so we didn’t have to walk 3km’s back to Darwin’s!